Build a Lab – online lab for Kubernetes
Good news everyone! I passed my CKA Exam and I got a pass on the first try. To practice I used an online lab and I have to say, I am a fan. This is why I am going to share how I set up an online lab for Kubernetes. How it was set up, how I used it and why it is so great. Little disclaimer, it is not a free solution. Also, I am not in any way related to the company and solution I am using. Just a happy user. Now, let’s build a lab!
Why an online lab
My biggest issue with homelabs, even the cool ones, is maintenance. The need for maintenance and timing is almost never right. Of course, doing maintenance and running into issues is great for a learning. I get that. Frankly though, I do not want to be bothered by this when practicing and studying for an exam. In my case I wanted to study for the Certified Kubernetes Administrator exam.
Another issue would be space and hardware. And let’s not forget, the energy bill. Having a 19” rack in your attic is cool, just not for everyone. That is why I am always searching for good and affordable online options. I don’t need a lot, I just need enough.
My choice – aCloudGuru Playground
There is a lot of online stuff where you can find playgrounds, sandboxes and more. Usually available for a couple of hours. Which is cool, but I like something more permanent. Preferably without having to setup and maintain my own lab in a cloud like AWS, GCP or Azure. I am lazy, I want this to be done for me! 😉
This is how I discovered aCloudGuru. It is a site where you can do training and hands-on labs on a variety of cloud products. Which is cool, but not special. Also, there are some sandbox options for Azure, AWS and GCP. Again, cool. The killer feature however is the cloud servers option in the playground.
Within this playground it is possible to spin up resources within a limited resource pool. The cool part is that from the moment you turn on your resources they are available for two weeks. That means, every time you turn on your resources, they will be available for two weeks. So, just remember to turn on your environment once a week and you can have a long-term test-lab. With this subscription you also don’t need to worry about cloud costs. It’s covered. If you are interested, find more about the options here: Plans & Pricing | A Cloud Guru . And again, I am emphasizing that this is not a sponsored link.
some advantages
- Create your own environment
- Do whatever you want in this environment, it’s yours
- Keep it as long as you need it
- Accesible through putty/mobaxterm
- External dns record is saved for easy access
- Easy copy paste into vm’s from personal desktop source
- No worries about underlaying platform
- No worry about costs when running your vms
some disadvantages (compared to a self-owned lab)
- Not suitable for large deployments
- Environment disconnect after 4 hours
- Subscription to aCloudGuru with Playground is not free
Use cases
My first use-case was of course the CKA training. The CKA training has some hands-on labs, but I wanted to practice more and be able to save my work. This is where the ‘permanent’ lab comes to the rescue. In this post I will describe my set-up for this specific goal. However, there are more use-cases to think of. For example, I have used the lab to test kpack which pulls and pushes images to a Google Container Registry. Also, in the near feature I will very likely be using the lab options to learn more about Terraform. Pretty cool stuff. There is a good chance that I will follow up on this, most likely covering my experiences with kpack.
Setup
There are several ways on how to approach this and it is of course up to your likings how you do it. Feel free to customize,
Goals
- Prepared online lab, ready for Kubernetes installation
- Be able to save work
- Easy access with MobaXterm
Prerequisites
- aCloudGuru subscription with Playground access
- MobaXterm – free version is sufficient. Find it here: https://mobaxterm.mobatek.net/download.html
Playground – cloud servers
Create three medium sized Ubuntu VM’s. When using it for a Kubernetes installation you might want to label them as control-01, node-01, node02. Just for oversight, it does not really matter as long as you know which is which. Wait till they are ready. When ready you should be provided with connection details and credentials
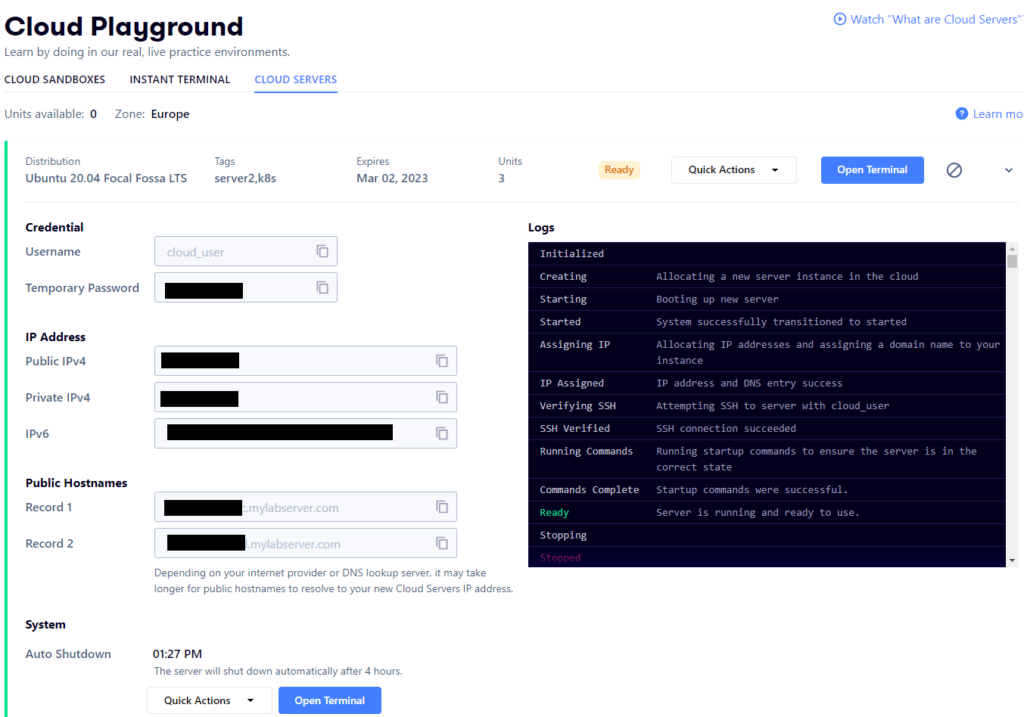
You can open a terminal from the cloud servers playground, but let’s go straight to MobaXterm. You can probably do the same with other tools as well, I just like the look and feel of this one.
Build a Lab in MobaXterm
- Start MobaXterm
- Create a new session and call it control-01. Or in my case it is called k8s-control.
- Now in the Playground open the details for what should be the control-node and copy one of the public DNS addresses.
- the public DNS addresses will remain the same as long as you VM exists.
- the public IP changes with every reset.
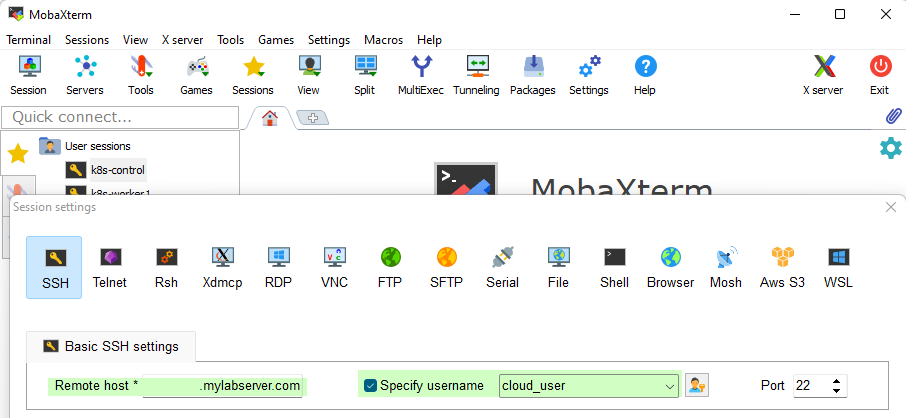
- Then in MobaXterm rightclick and edit the control-01 session. Paste the DNS address in the ‘Remote Host’ field.
- Check the ‘Specify Username’ field and name it ‘cloud_user’
- Save your settings
- Open (doubleclick) the session en login with the temporary password from the Playground
- If you do not get prompted to change your password, you can do this yourself: sudo passwd cloud_user and change it to one you would like to use
- Exit the session and log back in again with your own password.
- MobaXterm has a system to store your password. You should be prompted for this while logging in. If you accept to store your password, next time you will only have to start the session. No login required. Super easy!
- Now use this command to set the hostname: sudo hostnamectl set-hostname control-01 (or any name you would prefer).
- Repeat these steps for node01 en node02. Again, naming is up to you.
- Now for the last step, to let them communicate you will need to edit the /etc/hosts file on every node. You will need the private IP addresses from the details in Playground. Add lines to the hosts file like this:
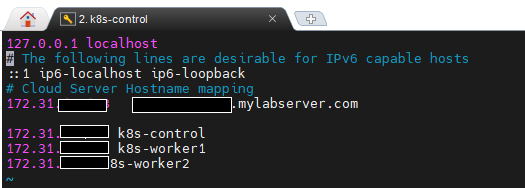
- Exit the sessions and log back in again. Now you should be ready to go.
note
To actually get the Kubernetes working you will need to do some more configuration. However, that is not the scope of this post. For that I would recommend the CKA training or the various Kubernetes docs available on the world wide web. These instructions are to create a 3-node lab which is theoretically ready for installing Kubernetes.
Hands on labs
This might be useful when you are actually doing the CKA training from aCloudGuru. When you start a hands-on lab you can connect to it the same way as your ‘permanent’ lab. However, the hands-on lab is not permanent. It only lives for an hour and then disconnects. To still utilize MobaXterm in an easy way I do this:
- Create three sessions and name them like you wish. I prefixed them with ‘lab’. For readability something like ‘hol-control-01’ would make a little more sense.
- Check the ‘Specify Username’ and name it ‘cloud_user’
- Whenever you start the hands-on lab copy and paste the public IP into ‘Remote Host’
- Start the remote session and copy-paste the temporary password
- You are good to go
- For a new hands-on lab, just replace the public IP in ‘Remote Host’ for the new one and use the temporary password.
Conclusion
I am sharing this because it saved me a lot of time and frustration while studying. I have all my lab-connections in one place, MobaXterm. And even though it’s necessary to edit sessions when using hands-on-labs, it’s still all in my MobaXterm and very easy to connect. Also, the ‘permanent’ lab does not require editing and is always available to work on. It is not restricted to Kubernetes only. I will show this in a follow up blog that most likely, but not guaranteed, will cover building an application with kpack. And then run it on Kubernetes.
About the CKA exam
While this post is inspired by taking the CKA exam, I did not cover hints and tips for the exam. On purpose, because there is so much already out there. If you are up for the CKA exam and you need some tips or guidance, please feel free to contact me.
More on Tanzu and Kubernetes:
https://www.codecrusaders.nl/cloud-native/kubernetes/kubernetes-and-tanzu-recap-2022/